Console Configuration
Introduction
The console configuration contains all the data you need for initializing a console instance. This includes settings for remote access, and the list of commands sorted within categories.
In code it is represented by the CosmosConsoleConfig class.
Creating a new configuration
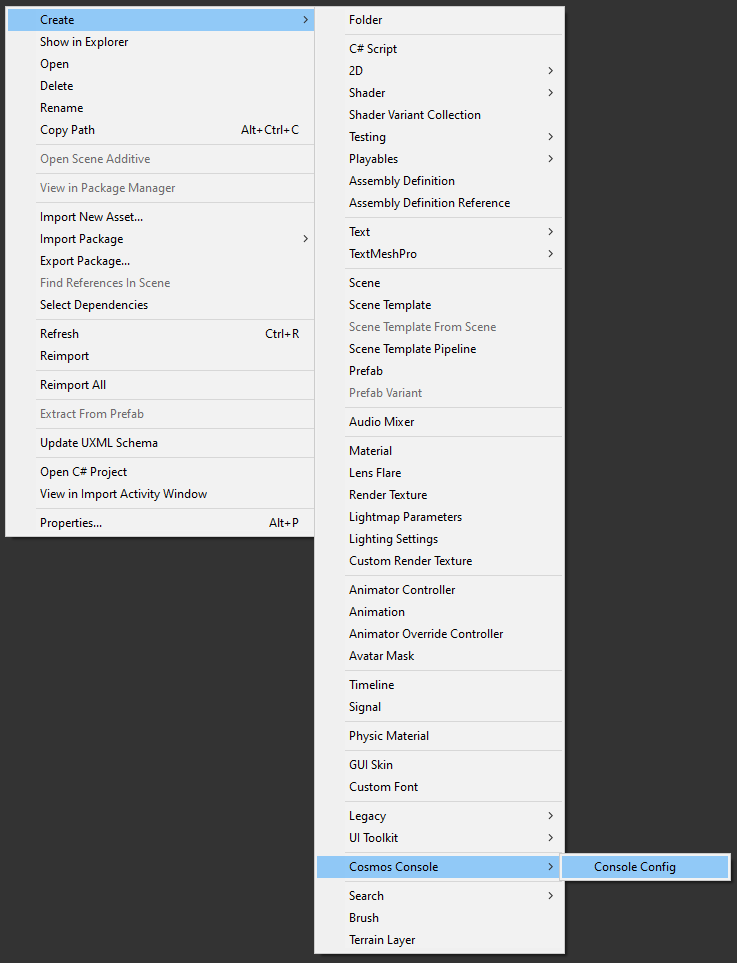
You can create a new CosmosConsoleConfig asset from the Create menu. Simply right-click in your project window and navigate to Cosmos Console → Console Config.

Select the newly created asset to view it in the inspector window.
Overview
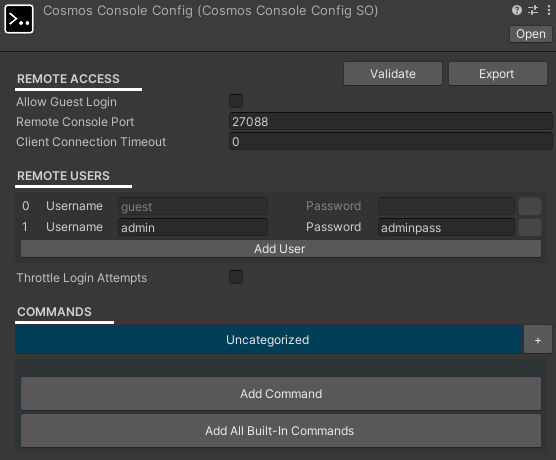
A new console configuration looks as follows in the Unity inspector.

Remote access
- Allow Guest Login: enables the use of the "guest" login, allowing remote consoles to connect without providing any user credentials. Be careful what commands you allow to be executed by the guest user, as these should be considered publicly accessible.
- Remote Console Port: this is the network port that the console will listen on when in server-mode.
- Client Connection Timeout: the timeout in seconds since a client's last command before they're forcefully disconnected from the server console. If the value is 0, there is no timeout.
Remote users
- When a client console connects to a server console it has to provide one of these user credentials. You can specify which commands a user has access to (see Commands).
- The guest and admin users are added by default and cannot be removed. The guest user can be disabled with the "Allow Guest Login" toggle. The admin user can be renamed or given a different password (which is recommended).
- The option to "Throttle Login Attempts" helps against automated brute-force login attempts. Once ticked you can configure how much each login attempt will be delayed after a number of incorrect login attempts.
Commands
- This is the list of available commands. Initially it will be empty. You can use the [Add All Built-In Commands] button to add the set of built-in commands including "help" and various networking related commands. See Commands for more detail.
[Validate] button
- Pressing the [Validate] button will check if all data in the configuration is valid and prints a report to the Unity debug console. Usually any invalid data will also make the relevant text field show a red background. Using duplicate names or invalid characters is the most common cause for invalid data.
[Export] button
- Pressing the [Export] button will bring up the file save window and export a filtered version of your configuration in JSON format, for use with external console clients (such as the Standalone Client). Commands with the execution type "only call and execute on server" are excluded from the file.
Commands

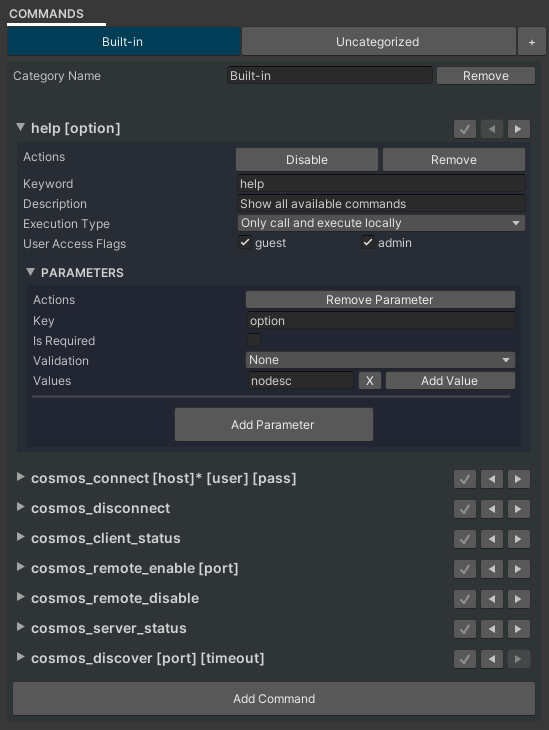
The above example shows the built-in commands
Commands are sorted in categories to make them easier to manage. You can add a new category by pressing the [+] button next to [Uncategorized], or remove one using the [Remove] button next to the "Category Name" field.
The command signature strings are used for the command foldout. These are in the format:
<keyword> [parameter1_key] [parameter2_key] [etc...]
An asterisk symbol next to parameter denotes that it's a required parameter.
The buttons on the right of the command names have the following functions:
- [V] checkmark button: allows you to multi-select commands. Once you have a selection, buttons will appear below the list to switch the categories of all the selected commands, or to copy / paste commands (which can be used across different console config assets).
- [<] arrow button: move the command up the list order
- [>] arrow button: move the command down the list order
Per command you'll have the following settings in the foldout:
[Disable/Enable] button and [Remove] button
- Disabling the command will make it so the console won't process any calls to it, and is excluded from the built-in "help" command printout and autocomplete.
- Pressing the [Remove] button will remove the command entry from the configuration entirely.
Keyword
- The (unique) keyword that your command uses.
Description
- A text field to describe the basic function of your command, it's included in the built-in "help" command printout.
Execution Type
- Determines from where this command can be called, and where it is executed. Values are:
- Only call and execute locally: the command is processed by the local console, even if connected over the network it won't be send to the remote console. This is used by the "help" command for example.
- Only call and execute on a server: the command can only be called on a console in server-mode, and not by any connected clients.
- Only call and execute on a client: the command can only be called on a console in client-mode, but will not be send to the connected server console.
- Call from client, execute on server: the command can only be called from a client console to be executed on the connected server console. Note that the command cannot be called from the server console itself.
- Call from client or server, execute on server: the command can be called from the server console or a connected client console. This is the most common option for commands and is also the default setting when adding a new command.
- Determines from where this command can be called, and where it is executed. Values are:
User Access Flags
- Set, per user, if they are able to execute this command. If a user does not have access to the command it also won't show up on the built-in "help" printout or in autocomplete.
Parameters
6.1. [Remove] Button
Removes the parameter from this command
6.2. Key
The parameter key string
6.3. Is Required
Indicates if this is a required parameter. The command will not execute if this parameter is not included.
6.4. Validation
Additional validation options for the parameter input. The command will not execute it the input does not meet this validation requirement. Values are:
- None: no additional validation.
- Boolean: the input has to match either "1", "true", or "on" to be true. Or "0", "false", or "off" to be false. Other input is invalid.
- Integer: the input has to be a whole number.
- Positive Integer: the input has to be a whole number equal to or larger than 0.
- Float: the input has to be a number
- Positive Float: the input has to be a number equal to or larger than 0
- Use Values Array: the input has to match one of the text entries in the "Values Array"
6.5. Values Array
- A list of preset values for your parameter. If the "Validation" is set to "Use Values Array" the parameter input has to match one of its entries. The entries are also used by the autosuggestion system.